Friday, February 29, 2008

Dollar Find Friday!! (Easter Tree)

FINALLY!!

Today's dollar find Friday is going to be a tad different. Instead of just altering one thing that I found for a dollar I'm going to be doing a project with a few inexpensive items.
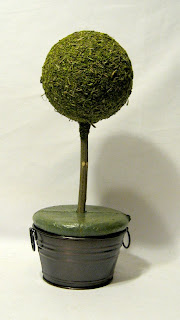


Easter Tree


Supplies:
Spanish Moss- $1.99
Topiary tree- $2.99
Egg ornaments- $1.19
Copper mini bucket- $1.49
Sandpaper (not pictured)


Adhesive- I used both hot glue and tacky glue


Step 1- Cut off the bottom of the tree foam so that it will fit into the container.


Step 2- using small amounts of moss, wind it into a flat disk shape as tight as you can. Repeat as much as necessary to cover the entire top of the tree.


Step 3- Adhere the moss discs to the tree with hot glue


Step 4- Using scissors, trim the tree.


Step 5- Sand the rough edges of the foam


Step 6- Spread the top of the foam base with tacky glue and sprinkle moss on top to look like grass

* I cut the moss into tiny pieces with scissors


Step 7- Use hot glue to secure the tree into the bucket.


Step 8- glue the egg ornaments on the top of the tree with hot glue and finish as desired.


Technical difficulties.....

I have been trying ALL day to get my Dollar Find Friday post up but every time I try, blogger freezes my system up. I promise to have it up ASAP though!

Thursday, February 28, 2008

I finally finished my card yesterday, but I'm not completely satisfied with how it turned out. Oh well, I guess you win some and lose some right? It's all part of the creative process.....

Supplies: Stamps- Fabulous flowers, lexicon of love, Inkadinkado. Paper- Certainly celery, almost amethyst, very vanilla. Ink- certainly celery, almost amethyst. Accessories- Rhinestones, ribbon, corner punch, corner rounder, dimensionals.


Don't forget to check in tomorrow for the Dollar Find Friday! I have a really cute project to show...

Wednesday, February 27, 2008

I've been working on my card for the sketch challenge all morning and it still isn't coming together like I want. So I decided to share with you two scrapbook pages that I completed yesterday. I'm still working on my scrapbooking "style" which isn't all that common. I like to make my pages more card like than traditional scrapbook pages. Does that make any sense lol? One of my favorite things to do is find a card that inspires me in the SCS gallery and kind of case it into a scrapbook page.

The following page was inspired by this card by cincimom


And here is my page


The next scrapbook page was inspired by this beautiful card by my friend Wendy (SCS Gallery & Blog)


And here is my other page

If you would like to see some more scrapbook pages that I have completed, there is a link to my iSCRAP gallery off to the left hand side of my blog.

Tuesday, February 26, 2008

The color challenge for this week is Basic black, river rock and Whisper white. Very simple and elegant colors.


Here is my card-

Supplies: Stamps- Fabulous flowers, Always, inkadinkado. Paper- Black, river rock, white. Ink- river rock, black. Accessories- Dimensionals, scallop scissors, paper crimper, paper piercer.


Monday's challenge was to use different patterns together on a card. I loved the look of the flowers that I did on the featured stamper card so I decided to case myself and make a similar card. I changed up the colors so that it was different than the first one though.


Supplies: Stamps- Beautiful blooms, mini backgrounds (unknown), TAC Be. Paper- Cool Caribbean, very vanilla, black. Ink- Cool Caribbean, black stazon. Accessories- Ribbon, scallop scissors.

Monday, February 25, 2008

And the winner is.....

The winner of this weeks card give away is milkshake007! Please e-mail me your info and I will get the card of your choice sent out tomorrow!

*********************
This weeks featured stamper is Mary Jo Albright. I have been admiring her gallery for a long time now and was very excited to case one of her cards. Here is the card from her gallery that I chose to case-
And here is my card. Here is a list of things that I changed about my card-
  • Different colors
  • Didn't add the corner element
  • Make the card a standard 4.25 x 5.5 instead of square
  • Different stamps
  • Different color ribbon
  • Altered the corners with a ticket corner punch
Supplies: Stamps- Friendship Blooms, Mini backgrounds (unknown). Paper-Old Olive, Purely Pomegranate, Very vanilla, Black. Ink- Old Olive, Purely pomegranate, Black stazon. Accessories- rhinestones, stardust gelly roll pen, ribbon, ticket corner punch, scallop scissors, paper piercer.
**************************
Here is a sneak peak of my projects to come for this week. I have a very exciting tutorial planned for Friday (As long as everything goes as planned lol!)


Sunday, February 24, 2008

Week in review (Feb. 18-24) and Card Give Away!

Here are all the projects that I completed this week. I've had a lot of fun with my new stamp sets and I can't wait to play with them some more!

Card give away- If you would like one of these cards for your very own, leave me a comment. I will use a random number generator tomorrow afternoon from the comments left and that person can pick from any of these cards that they would like and I will send it to them!

Thank you to everyone who takes the time to stop by!


Saturday, February 23, 2008

Inspiration Challenge

Today's inspiration challenge was a great one! I just love these colors and couldn't wait to make a card with them. The colors I chose to use are Old Olive, Pretty in Pink, Very Vanilla and Soft Sky.

This is the inspiration piece


Here is my card

Supplies: Stamps- Always. Paper- Old olive, pretty in pink, soft sky, very vanilla. Ink- Old olive, pretty in pink, soft sky, Versamark. Accessories- Dimensionals, silver brads, clear embossing powder


I received my two new sets last night- Always, Fabulous Flowers and the Sale-a-Bration set Friendship blooms. Of course I had to play right away! I ended up making three cards last night. I did the challenge and the two cards below.


This card was made for Beate's Weekend sketch challenge. You can find that here.

Supplies: Stamps- Fabulous Flowers. Paper- Chocolate chip, very vanilla. DP by Creative Imaginations. Ink- Really rust, Sahara Sand. Accessories- Rhinestones, clear embossing powder, dimensionals.


And this one was made for Toy's Weekend Sketch Challenge found here.


Supplies: Stamps- Always. Paper- Chocolate chip, Sahara Sand, Ruby red, very vanilla. Ink- Chocolate chip, ruby red, versamark. Accessories- scallop scissors, paper piercer, stardust gelly roll pen, clear embossing powder, rhinestones.

Thursday, February 21, 2008

Dollar Find Friday!! (Lampshade)

I got the idea for this next tutorial from my demo Louise who was kind enough to share her lampshade template to use for this tutorial. My tutorial for today is turning wine glasses into lamps. My Dollar Tree has a lot of different styles of wine glasses and I couldn't wait to try this out!


Supplies-
Wine glass (long stem with short bowl works best)
12x12 sheet of Vellum
Lampshade template ( found here )


Step 1- You will have to play with the lampshade template to adjust it to the size that will fit your wine glass. After you get your template to size trace (using a pencil) onto your vellum and cut out.


Step 3- Stamp onto the vellum. I used black stazon for this, stamped off once to get the lighter color.

Step 4- Decorate as desired.
Step 5- I used mono adhesive to adhere the edges together. place on your wine glass and add any finishing touches. When complete, you can burn a tea lite candle inside the wine glass to make it look like a real working lampshade!

Window card

Today's ways to use it challenge was a fun one for me. Window cards. I'm not sure if I have done this type of card before but I know that I will be doing more in the future! I thought since I haven't used my Natural Beauty and Embrace Life in a couple of days that I would brush it off and use it for this card ;) My new stamps should be coming in either today or tomorrow so I promise that you won't see so much of these two sets anymore lol!


Supplies: Stamps- Embrace life, Natural beauty, lines (unknown). Paper- basic grey, ruby red, groovy guava, river rock, white. Ink- ruby red, groovy guava, basic grey, river rock, black stazon. Accessories- scallop punch, circle punch, rhinestones, sardust gelly roll pen, stickles, ribbon.

Don't forget to check in for tomorrow's Dollar Find Friday tutorial!

Wednesday, February 20, 2008

Sketch challenge and family tree project!

Today's sketch challenge was another easy layout. I absolutely love all of the cards I see in the gallery that have images colored with copic markers and have been trying to find the best alternative (for me) with what I already have. On one of our projects at stamp camp this weekend we colored our flower image with watercolor crayons and a blender pen. This is so much fun and so easy to blend! It is most likely going to be my way of coloring images from now on!

Here is the sketch challenge for this week


And here is my card-
The image was an image RAK sent to me. I just love Whipper Snapper stamps! I would love to get my hands on some more of these cuties.


Supplies: Stamps- Whipper snapper, Canvas. Ink- Bashful blue, black stazon. Paper- Basic grey, bashful blue, white. Accessories- Cuttlebug folder, ticket corner punch, rhinestones, ribbon, stickles, blender pen, watercolor crayons.

******************************************

And here is a project that I worked on yesterday. I picked up an adorable family tree frame at my local Dollar Tree this weekend and couldn't wait to play with it! I have had this designer paper by Poppet Places since this summer and thought that it would work perfect for a background.

I ripped off the frame stand because I didn't need it. I wanted to try to recreate the same type of texture as the paper so first I painted the tree with acrylic paints and then stamped (using my canvas stamp) with a light tanish color on top of that. When that was dry (which took a matter of minutes) I sponged a little bit of dark green on random parts of the top of the tree. Then I took pieces of tissue paper, painted them with a watered down light green acrylic paint and added them to different parts of the top of the tree. I then sealed it with an acrylic sealer.


I have had this box frame since May (it came in a set at Costco) and haven't been able to figure out what I wanted to do with it yet. Turns out that this 12x12 paper fit perfectly inside after a little bit of trimming.


Here is the finished product-


Tuesday, February 19, 2008

Today's color challenge was a difficult one for me. Pumpkin Pie, Orchid Opulence and Certainly Celery. What the heck am I supposed to do with THAT? So I flipped through my stamp binder and came across this stamp. I thought that it would work perfectly. I water colored the image with my ink pads. Overall I'm pretty happy with the way that this card turned out! And it was a really quick card too which HARDLY ever happens for me.


Supplies: Stamps- Lavender (unknown), small background stamp by See D's. Ink- Pumpkin Pie, Orchid opulence, certainly celery, black stazon. Paper- Certainly celery, white. Accessories- watercolor brush, ribbon, stardust pen, butterfly rhinestone

Monday, February 18, 2008

And the winner is.....

BILLIE! E-mail me your address and I will get the card that you choose into the mail to you!

**********************************

My friend Amanda was the host of this weeks technique lovers challenge which was to make this cute envelope pouch. You can see her tutorial for it here.

Since I still had some of the supplies out from the altered chalkboard that I made, I decided to go with that theme. I used a plain white envelope and painted it with acrylic paint. I love the acrylic paint because it dries very quickly with a little heat from a heat gun. I used the same designer paper from K & Co.


Supplies: Stamps- Embrace Life. Ink- Always Artichoke, Creamy caramel, close to cocoa, cool caribbean, black stazon. Paper- K & Co., white, Always artichoke, true thyme. Accessories- scallop punch, circle punch, rhinestones, stardust gelly roll pen, scallop scissors, acrylic paint.

******************************************

Here is a sneak peek of my alterable shelf and the projects to come for this week. So stay tuned!


Sunday, February 17, 2008

Week in review (Feb. 10-17) & Card Give away!

There doesn't seem to be much in this picture project wise, but I really didn't want to add in all of the V-day stuff that I did this week also.


Here are the cards that I have available for this weeks give away! So if you would like one of these cards, leave me a comment and I will use a random number generator to pick a number from the comments left. I will get a hold of the winner to get their info and send them their card.


*********************************************
Last night I decided to work on my last project on my alterable shelf. I picked up this chalkboard and chalk set at my local dollar store.


Here is the after picture. I used designer paper by K & Co. to cover the frame. I didn't like the idea of trying to cover the chalk boxes to decorate so I took the box apart and traced it onto True Thyme paper and then stamped Vine by TAC with acrylic paint. I also painted the eraser to match and sprayed it with acrylic sealer to help protect it. I used letters from a die cut letter pack that I got at walmart and inked the edges with Always Artichoke ink. I used a gold pen to add detail and of course added some rhinestones.


Here is a close up of the chalk boxes when finished.


******************************************
Yesterday was my stamp club. I love these days because I get to get away for a few hours and stamp with no interruptions from little monkeys!
The challenge this month was to use SU rub ons that my demo gave to us. I chose to use a small frame (they came in a six pack at my Dollar Tree, and it happened to be one of the things on my shelf to have altered this week) I added some rhinestones and rhinestone shapes that I got at my Michaels dollar spot.


Here are the treats that I made for all my stamp club friends. They are Bugles dipped in white chocolate and then dipped in red colored sugar. They are supposed to look like mini ice cream cones. They are so easy and so cute! I got this wonderful idea from Becky Fisher's wonderful blog.


*After re-reading this, I just wanted to clarify that this isn't MY stamp club, but a stamp club that I am apart of. The two following cards were designed by my absolutely wonderful demo Louise! I just added my watermark to the photo so that the pictures don't get "borrowed"*

One of the cards that we made at stamp club was using the Dahlia fold that I did a tutorial on a couple of weeks ago. I love how simple this is!


The other card we made was a lattice card using the new stamp Morning Soft. I can't believe that I have never tried this before! So very simple and very different.


Thanks for stopping by! I'll be posting a picture tomorrow of the new things on my alterable shelf to get done during the week so don't forget to stop by and check it out.

Saturday, February 16, 2008

Since my Cupid (Keri) already received the package that I sent her, I thought that I would share two of the things that I made. I found this gorgeous box at Michael's for $1 and just had to get it. There was also some matching ribbon that I picked up too. I just happened to have some paper that I thought would go really well with the theme of the box and made a matching card.


Inside the box I made a cardboard insert to raise the bottom up a bit and then covered that in the same patterned paper that I used on the card. I then decorated some nuggets using Papertrey's Limitless Labels and added rhinestones. I also added some cherry cordial kisses.


I have my stamp club this morning so tomorrow I will take pictures of the treats that I made for my stamping friends, the challenge I did for group as well as the card that we make today.
Have a wonderful Saturday!